- FEATURED BRANDS
- Blog
- How to Choose a Car Jack
- How to Recharge a Dead Car Battery
- Brake Pad Replacement
- Car Isn’t Warming Up?
- Jumper Cables or Booster Pack?
- Fuel Additives
- See all blog articles
- How to Replace Brake Pads and Rotors
- Complete Guide to Towing a Trailer
- Detailing Products and Expert Advice
- What Are Fuel Additives
- How to Recharge Your Car's AC
- How to Fix a Chip in Your Windshield
- DEALS
In-STORE PICKUP
Same day if availableFREE SHIPPING
On orders $75 and moreFree Returns
Easy & hassle freeNAPA REWARDS
Earn Rewards today!
text.skipToNavigation

TOPICS
VERIFY YOUR ENTIRE ACCESSORY BELT DRIVE SYSTEM
Difficulty: Easy
Duration: 20-30 minutes
How often: every 100000 km (check you owner's manual)
Don't just check your drive belts; check the entire accessory belt drive system!
It is common today that many people take their vehicles accessory belt drive system for granted. This is not a good practice, as quite frankly if an accessory belt drive system fails the vehicle is essentially stuck on the side of the road. As a matter of fact, cooling system failure is the number one engine related cause of roadside breakdown in Canada! How do you prevent this from happening to you? Looking at just the belt alone is not the answer in today's vehicles. The full accessory belt drive system must be inspected. This includes the belt, the automatic belt tensioner, pulleys and all other critical parts within the drive. Fixing only part of the problem is certainly not enough and could result in potential roadside breakdown leading to more costly repairs, not to mention the inconvenience it creates.
There are primarily three reasons for belt replacement:
- The belt is worn out and requires replacement due to: cracking, chunk out, material loss, fraying, uneven wear or shiny spots from heat/slipping.
- Preventive maintenance.
- Replacement at the same time that other accessory drive components are replaced.
TOOLS AND EQUIPMENT
TO REMOVE AND INSTALL A BELT, YOU WILL NEED:
- 3/8-in. extension and ratchet
- Torque wrench
BEFORE YOU BEGIN
Proper maintenance and service procedures are vital to the safe, efficient operation of all motor vehicles, as well as to the safety of the person performing the work - you. Whenever you are working on your vehicle, we recommend that you follow these important safety rules:
- Do have a first-aid kit handy.
- Do be careful when working around hot or sharp objects.
- Do follow the manufacturer's instructions for all products.
- Do use safety stands under the frame or drive-on ramps if you must raise your vehicle.
- Don't run the engine without proper ventilation.
- Don't smoke when working around the engine.
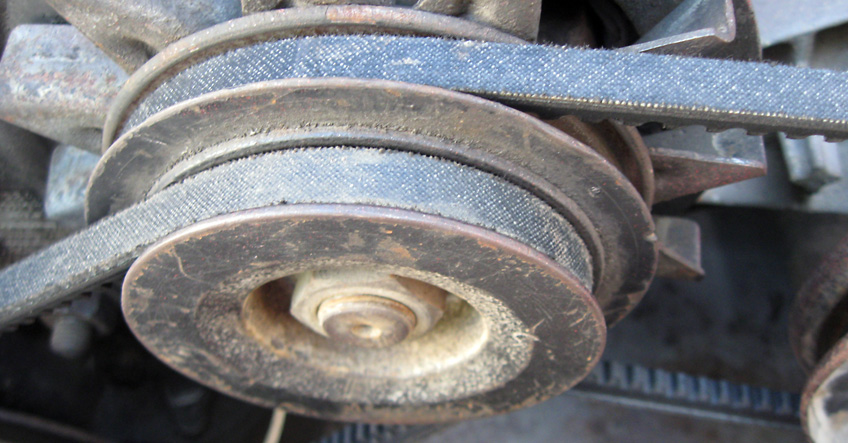
BELT INSPECTION
- A belt cycles over 350 million crank shaft revolutions over 160,000 kilometers, which translates to nearly one hundred million belt revolutions, imagine that!
- Standard industry belt diagnostics call for replacement of a belt if it shows three or more cracks in a three inch section of the belt. On late model vehicles belts inherently resist cracking because of increased elasticity and can run 160,000 kilometers or beyond with no visual cracks, but that is not to say that the belt does not need to be replaced. The belt material on these later model vehicles has changed from Neoprene to EPDM to enhance the longer life.
- A far better indicator of wear on belts today is material loss. Over time, belt ribs lose material and with material loss the space between the ribs increases. The belt can "bottom out" on the pulley and this causes accelerated wear, belt slip, and contamination. One way to check this wear is utilizing the NAPA Belt Wear Gauge (see image on right).
- Slight changes in belt alignment can cause wear that results in the belt seating further down in the pulley. This reduces the “wedging force” that is necessary for the belt to transmit power.
- Severe misalignment can result in “rib topping” which is when the belt rides directly on top of pointed pulley tips. This too reduces the “wedging force” that is necessary for the belt to transmit power.
- Belt slip from a worn belt that has stretched in length can cause the belt tensioner to bottom out resulting in significant system tension reduction. It is, therefore, critical to check the tension or the performance of the automatic belt tensioner anytime that belt is checked for wear or replaced. A persistent check engine light may be an indicator of this problem.
- The best practice is to begin checking belts at 80,000 kilometers to ensure that the belt rib is uncompromised and is not showing wear. Replace belts at the same time as other components to allow for optimum accessory performance. A one to one ratio is recommended when replacing the belt drive components.
- The illustration below shows how belts on later model vehicles wear out to the point of needing to be replaced versus the cracking that we used to look for on older vehicles.
INSTALLATION
- At first glance, serpentine belt systems appear much more complicated than they actually are. With a basic understanding of the system, and a few simple rules, serpentine belts are easy to install.
- Most vehicle manufacturers have anticipated potential difficulties that may occur when installing a serpentine belt. Such as: 1) Belt Routing, 2) Which pulley moves to adjust belt tension. Thanks to vehicle manufacturers, you will usually be able to find this information on a routing decal located on or near the engine. Belt routing can also be found in some owners’ manuals. The decal diagrams belt routing around pulleys, and usually indicates direction of movement for the tensioner pulley.
- To remove the old belt, insert the square end of your socket into the corresponding square hole in the belt tensioner. To release the tension, pull the handle in the direction of the arrow. While holding it back, slide the belt off any of the pulleys. Then SLOWLY release the tensioner.
- Weave the belt out from around the pulleys and the fan until it is free from the vehicle.
- Now it’s time to route the new belt. Once the new belt is crudely wrapped around each pulley, to reinstall, it’s much easier if the last part you have to slip over is on the backside of the belt (non-ribbed side).
- Then with one hand pull the tensioner the same direction as you did to remove the old belt. With your free hand, slip the last bit of belt over the pulley. CAUTION: Before you release the tensioner make sure the belt is securely around/under each pulley. If not the belt could slip off and cause damage/injury.
- Belt should be seated into all pulley grooves and belt spans free of contact with engine components.
- Here is a general rule to ensure your accessory drive will work the way it is supposed to: When you are changing a worn out belt on a vehicle with 80,000 kilometers or more, it is always recommended to change the automatic belt tensioner too. Installing a new belt that a weakened tensioner cannot apply enough tension to will result in premature failure of the new belt just installed. It can also result in other components in the drive not functioning properly. This includes the alternator, power steering pump and A/C compressor.
QUICK TIPS
- Follow these instructions carefully. Read and be sure you understand them before you begin.
- Gather all your tools and supplies before you begin.
- Allow plenty of time to do the job so you don't have to hurry.
- Remember that these are general instructions. For more detailed instructions pertaining to your specific vehicle, consult an appropriate repair manual.
- Safety is important whenever you're working around machinery. Beware of hot objects, sharp instruments and hazardous materials.
- Don't substitute tools unless you're sure it won't compromise either your safety or the performance of your vehicle.
- If you have any questions about repair and maintenance, contact your local NAPA Auto Parts store. Find the nearest NAPA Auto Parts location.
