- FEATURED BRANDS
- Blog
- How to Choose a Car Jack
- How to Recharge a Dead Car Battery
- Brake Pad Replacement
- Car Isn’t Warming Up?
- Jumper Cables or Booster Pack?
- Fuel Additives
- See all blog articles
- How to Replace Brake Pads and Rotors
- Complete Guide to Towing a Trailer
- Detailing Products and Expert Advice
- What Are Fuel Additives
- How to Recharge Your Car's AC
- How to Fix a Chip in Your Windshield
- DEALS
In-STORE PICKUP
Same day if availableFREE SHIPPING
On orders $75 and moreFree Returns
Easy & hassle freeNAPA REWARDS
Earn Rewards today!
text.skipToNavigation

TOPICS
HEADLIGHTS, BULBS AND FUSES REPLACEMENT
Difficulty: Easy
Duration: 5-10 minutes
How often: When lights dim or burn out
Why replace your headlights, bulbs or fuses?
Properly maintaining your bulbs, headlights and fuses is vital to the safe operation of your vehicle, as well as the safety of you, your passengers and other drivers on the road. Generally, most lighting problems are the result of burnt-out bulbs or fuses.
The instructions below will help you replace your burnt-out bulbs, headlights and fuses quickly and correctly. Although such replacements usually aren't difficult, be sure to READ these instructions completely before you begin.
TOOLS AND EQUIPMENT
YOU WILL NEED:
- A fuse puller
- A Phillips screwdriver
- A slot-head screwdriver
- A pair of pliers
- A small wire brush
- A rag or gloves
- A flashlight
BEFORE YOU BEGIN
Proper maintenance and service procedures are vital to the safe, efficient operation of all motor vehicles, as well as to the safety of the person performing the work—you.
Whenever you're working on your vehicle, we recommend that you follow these important safety rules:
- Do have a first-aid kit handy.
- Do be careful when working around hot or sharp objects.
- Do follow the manufacturer's instructions for all products.
- Do use safety stands under the frame or drive-on-ramps if you must raise your vehicle.
- Don't run the engine without proper ventilation.
- Don't smoke when working around the engine.
INSTALLATION
READ these instructions completely before you begin:
- Always keep an assortment of spare fuses in a variety of amperages in your vehicle.
- Get the correct parts. Consult your vehicle's owner manual or your local NAPA store for the right parts for your vehicle.
- Clean dirty or corroded sockets with a rag or wire brush before installing a new headlight or bulb.
- Always replace burnt-out fuses with ones of the same amperage. If a fuse continues to "blow," you should have the circuit checked professionally for defects.
Replacing Miniature Bulbs
Your vehicle uses many miniature bulbs. They're used to light everything from the instrument panel and glove compartment to the turn signals and brake lights. When these bulbs burn out, you can usually see the broken filament inside the glass. Miniature bulbs come in a variety of shapes, sizes, and styles. CAUTION: Always be sure the switch in the circuit is OFF before replacing any bulb.
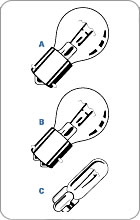
- Three of the most common bulb styles are shown in Figure 1:
- Single contact bayonet
- Double contact bayonet
- Wedge base
- To remove a single or double contact bayonet bulb from its socket, push in slightly and turn counterclockwise. For safety, use a rag or a glove to protect your hand in case the bulb breaks. If the bulb does break, use a pair of small pliers to remove the base from the socket.
- To remove a wedge base bulb from its socket, no turning is necessary. Pull the bulb straight out of the socket. For safety, use a rag or glove to protect your hand in case the bulb breaks.
- To insert a single contact bayonet bulb, place the base of the bulb in the socket. Make sure the index lug on the base is lined up with the slot in the socket. Then push in slightly and turn clockwise. For safety, use a rag or glove to protect you hand in case the bulb breaks.
- To insert a double contact bayonet bulb, place the base of the bulb in the socket. Make sure both index lugs on the base are lined up with the slots in the socket. If the lugs are staggered, make sure the short lug is lined up with the short slot and the long lug is lined up with the long slot. Then push in slightly and turn clockwise. For safety, use a rag of glove to protect your hand in case the bulb breaks.
- To insert a wedge base bulb, gently push the base straight into the socket. For safety, use a rag or a glove to protect your hand in case the bulb breaks.
Replacing Headlights
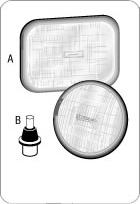
- There are two types of headlight systems: sealed beam systems and replacement bulb systems (see Figure 2). In the sealed beam systems, the headlamp bulb is permanently enclosed in a round or rectangular headlamp body (A). When the bulb burns out, the entire unit must be replaced. In replacement bulb system, sometimes called composite headlamp assemblies, a replaceable halogen bulb is used (B). When it burns out, it can be removed from the back of the headlamp body and replaced.
- Note: Always have the headlight switch OFF when replacing a headlamp body or halogen headlight bulb and WEAR EYE PROTECTION!
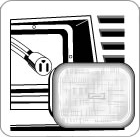
- To replace a sealed beam headlight, begin by removing any screws, housing, trim, retaining rings or molding from around the headlamp body. Remove the wiring plug from the back of the bulb. DO NOT disturb the adjusting screws used to aim the lamp (see Figure 3). Reverse the steps to install the new bulb, making sure the bulb is firmly and properly seated.
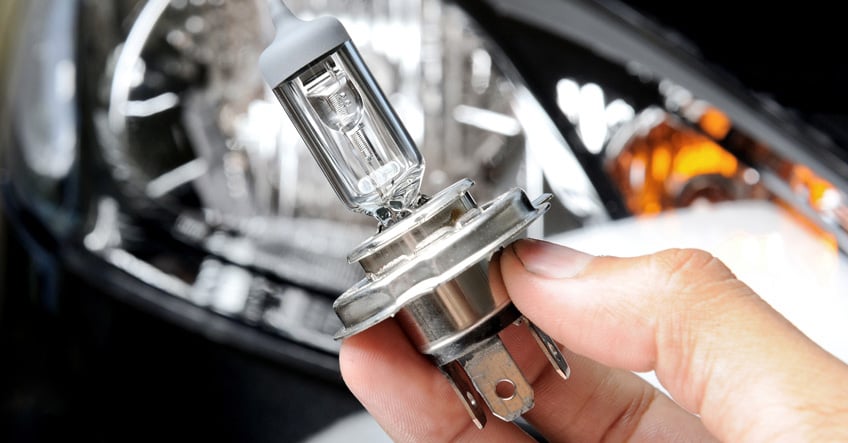
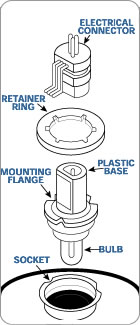
- To change a replaceable halogen bulb, open the hood and locate the bulb in the back of the headlamp (see Figure 4). Gently remove the electrical connector from the back of the bulb. If a retainer ring is present, remove it. Without twisting the bulb, carefully pull it straight out of the socket. Handle the bulb by its plastic base only. DO NOT touch the glass part of the lamp. The bulb contains halogen gas under pressure and it may shatter if scratched or broken.
- Line up the new bulb in the socket and push it in until the plastic mounting flange on the bulb touches the back of the socket. Reinstall the retaining ring, and reconnect the electrical connector to the back of the retaining ring.
Replacing Fuses
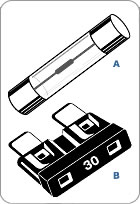
- Fuses come in two basic types (see Figure 5). Older vehicles use fuses made of glass (A). Newer vehicles use miniature plastic blade-type fuses (B). Both consist of a thin piece of zinc or wire, which melts when overloaded. Normally fuses are located under the dashboard, in the engine compartment or in the trunk. Refer to the owner's manual for the exact location of the fuses in your vehicle.
- Fuses can be removed with a fuse puller, an inexpensive tool available at your local NAPA Auto Parts store.
- When replacing a "blown" fuse, always use a new fuse with the same load amperage. The amperage is printed on the fuse. If the fuse continues to blow, have the circuit tested for defects.
QUICK TIPS
- Follow these instructions carefully. Read and be sure you understand them before you begin.
- Gather all your tools and supplies before you begin.
- Allow plenty of time to do the job so you don't have to hurry.
- Remember that these are general instructions. For more detailed instructions pertaining to your specific vehicle, consult an appropriate repair manual.
- Safety is important whenever you're working around machinery. Beware of hot objects, sharp instruments and hazardous materials.
- Don't substitute tools unless you're sure you won't compromise either your safety or the performance of your vehicle.
- If you have any questions about repair and maintenance, contact your local NAPA Auto Parts store. Find the nearest NAPA Auto Parts location.
