- FEATURED BRANDS
- Blog
- How to Choose a Car Jack
- How to Recharge a Dead Car Battery
- Brake Pad Replacement
- Car Isn’t Warming Up?
- Jumper Cables or Booster Pack?
- Fuel Additives
- See all blog articles
- How to Replace Brake Pads and Rotors
- Complete Guide to Towing a Trailer
- Detailing Products and Expert Advice
- What Are Fuel Additives
- How to Recharge Your Car's AC
- How to Fix a Chip in Your Windshield
- DEALS
In-STORE PICKUP
Same day if availableFREE SHIPPING
On orders $75 and moreFree Returns
Easy & hassle freeNAPA REWARDS
Earn Rewards today!
text.skipToNavigation

TOPICS
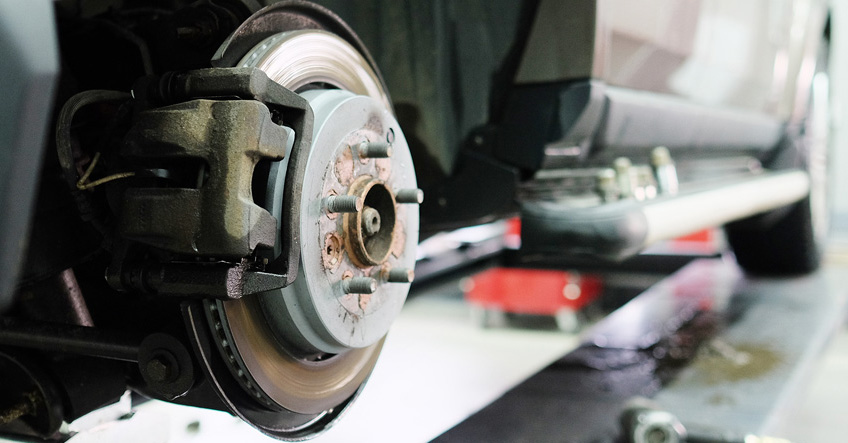
How to Replace Brake Pads and Rotors Step by Step
During your routine brake inspection, you noticed your brake pads or rotors are worn out. Luckily, replacing your brake pads and rotors is a fairly simple DIY task. Before you start, read through this step-by-step guide to make sure you have the right tools and to learn how to avoid some common mistakes.
These instructions refer to disc brakes only. Check your owner's manual or speak with a NAPA automotive expert if you're unsure which system your vehicle has or how to proceed.
How Often Should You Change Brake Pads and Rotors?
Most brake pads need to be replaced every 30,000 to 75,000 km, depending on your driving patterns, vehicle type, and road conditions. In Canada, road salt and heavy stop-and-go traffic can accelerate brake pad wear.
Rotors generally last 80,000 to 110,000 km but can wear faster depending on driving habits and whether your pads are left on too long. For example, daily city driving can lower the range to 50,000 km.
During a brake service, always change the brake pads and/or rotors on both sides at the same time.
Tools and Safety Gear for a Brake Pad Change
Before starting a brake pad and rotor replacement, prioritize your personal safety with safety glasses, gloves, and a dust mask.
The most important tools for a brake job include:
- floor jack and jack stands
- lug wrench.
- socket set
- C-clamp or brake pad spreader
- brake piston tool (for the rear brakes)
- torque wrench
Depending on your caliper bolt type, you may also need an Allen bit or torx set to loosen specific bolt types.
How to Change Brake Pads and Rotors: Step by Step
Step 1: Prepare the Vehicle
Park your vehicle on a flat surface, engage the parking brake, and loosen your tire lug nuts. Safely jack your vehicle and slowly lower it onto your jack stands.
Warning: Never work under a vehicle that is only supported by a jack.
Step 2: Remove the Wheel, Caliper, Pads, and Rotor
Once your vehicle is lifted, remove the lug nuts and wheel. Carefully remove the caliper and hang it with a wire hook so it isn’t dangled by the brake fluid hose. Remove the old brake pads and then the rotor. Coat the rotor centre hole with a light layer of brake lubricant or grease to make future removal as smooth as possible.
Step 3: Inspect the Rotor
Check your rotor for visual signs of wear, including deep grooves, scoring, or a raised lip on the outer edge.
While some surface rust is normal, severe pitting or cracking is a sign that the rotor has reached the end of its lifespan. Even if the rotor looks thick enough, measure the rotor thickness with a micrometer and replace it if it’s below the minimum spec, which is often stamped on the rotor itself.
Step 4: Clean All Mating Surfaces
Use sandpaper and a wire brush on the wheel hub face, hub centre, and brake pad carrier to remove caked-on debris so the rotor and brake pads seat flush. Lots of road salt exposure can cause heavy corrosion, so you may need a chisel for extreme buildup.
Finally, apply high-temperature paint to the caliper and exposed metal frame to prevent any future corrosion.
Step 5: Lubricate Correctly
Lubricate all contact points before installing the new brake pads. Use a silicone grease on the slide pins, a small amount of anti-seize on retaining pins, and brake grease/lubricant on pad-to-hardware contact points.
Warning: Never apply grease or anti-seize on the rotor surfaces or pad friction material. It can reduce braking responsiveness, causing a very serious safety risk.
Step 6: Install Brake Pads and Rotors
Carefully position the new rotor on the wheel hub face and spin it by hand to check for wobble. Install the new brake pads, reassemble the caliper, and torque all bolts to the manufacturer's specifications.
Note: Rear brakes with integrated parking brakes need a twist-and-compress motion with a brake piston tool to properly compress the caliper piston.
Step 7: Bleed the Brake System
Start with the wheel farthest from the master cylinder. Attach one end of a clear hose to the bleeder valve and submerge the other end in a container with fresh brake fluid at the bottom. This prevents air from being sucked into the system during this process. Then repeat the following process until there are no air bubbles visible in the hose. You will require another person to pump the pedal.
- Pump the pedal several times, then hold it down.
- Open the valve.
- Close the valve.
- Release the pedal.
Repeat this process on each remaining wheel, topping up the master cylinder reservoir to the fill line with fluid throughout.
Step 8: Bed In Your New Brake Pads
Seat the new brake pad material against the rotor surface by driving between 50 to 60 kph on a residential street or in a parking lot and gradually apply the brakes several times without coming to a complete stop.
While your brake pads continue to settle in, avoid hard stops for the first 300 to 500 km after a brake pad replacement.
How to Avoid Common Mistakes When Replacing Brake Pads or Rotors
The most common mistakes during a brake pad and rotor replacement are easy to avoid with a little preparation.
- Check your owner's manual for torque specifications before tightening caliper bolts and lug nuts
- Keep grease away from friction surfaces.
- Don't skip bleeding
- Always replace pads and rotors on both sides using quality, compatible parts.
For questions about parts or tools, visit your your local NAPA Auto Parts store.To chat with an automotive expert, or browse our selection of brake parts at www.NAPACanada.com
